Focus on the Easy Bits: CI/CD with Azure and Github
This tutorial will get you started with a basic CI/CD workflow using Github Actions to deploy a Web application to Azure.
CI/CD Overview
CI/CD is an acronym representing continuous integration and continuous delivery. According to CI/CD, the quality of software is correlated to how often it is deployed. If the deployment process is difficult, the quality of software will inevitably be low. If it is easy to make small changes and deploy them without much risk, software quality increases over time. It all starts with the practices and tools we use to create and manage software code.
Basic Version Control Concepts
- Distributed Version Control: It is difficult to implement CI/CD without a distributed version control system (DVCS) such as Git. Git fosters collaboration by allowing developers to make changes independently and reconcile those changes effectively. Older version control systems like SVN are less flexible. Complicated merges often make deployment difficult.
- Trunk: the copy of files representing the latest deployable version of software
- Cut a Branch: Make a copy of the software that can be changed independently
- Feature Branch: A copy of the software created for the purpose of making and testing changes before integrating with trunk
- Pull Request: Tools such as Github and Bitbucket allow a developer to signal to their team that their work is completed and ready for review. On approval, a pull request is merged to trunk.
- Merge Conflict: Developers sometimes make changes to the same lines of code independently. This causes a conflict when a pull request requires a code merge.
Continuous Delivery
Continuous delivery is a way of moving software changes to production. When it is implemented, software changes go live with a minimum manual intervention and very little deployment pain. Continuous delivery requires business practices such as building quality in, working in small batches, automating repetitive tasks, continuous improvement, sharing responsibility and collaborating across departments.[1]
Continuous Integration
Continuous integration helps us achieve continuous delivery. It is a method of writing software that prevents rework and long-lived, divergent projects. To achieve continuous integration, break work into small batches. These batches should be completed in a day or less. The developer starts their work by cutting a feature branch. When she completes the work, she opens a pull request and invites team review, then merges the feature into trunk. This reduces errors, increases developer learning, and facilitates collaboration.
Testing is key to the success of continuous integration. This includes automated unit tests and automated deployment to a testing environment on merging a pull request to trunk. Not everything relies on automation, however. Developers must manually verify their changes in the testing environment when they are deployed.
This is often called trunk-based development.
At the end of each development interval, we must have integrated, tested, working, and potentially shippable code, demonstrated in a production-like environment, created from trunk using a one-click process, and validated with automated tests.[2]
Unit Tests
Unit tests are simple programs that prove the program behaves predictably. A critical part of continuous integration is the assurance that if code is broken, unit tests will fail. This, in turn, means the deployment will fail. Broken code will not make it to production.
Prerequisites
- Github account configured to use SSH
- If you are unfamiliar with Node.js, please review the my COVID-19 Tracker tutorials:
- Install the Azure CLI
- Log in to your Azure account in the CLI
az login
Manage the Code
Since you want Github to deploy on your behalf, create your own repository for it.
git clone [email protected]:harveyramer/covid-19-demo-express-js-app.git
cd covid-19-demo-express-js-app

Name it whatever you wish, choose to make it public or private, and create your repository.
Replace the origin of this project ([email protected]:harveyramer/covid-19-demo-express-js-app.git) with your own and push this code to your repository. Assuming your name is John Doe and you named your repository My Repository, your commands will be the following.
git remote set-url origin [email protected]:johndoe/my-repository.git
git push
To check out the latest branch and install the project, execute the following commands.
git checkout tutorial-3
npm install
Run the Tests
This project uses the Jest unit testing framework to run two simple unit tests. One verifies that a getData function calls a specified API Url. The other checks to see that an HTML render function uses the data provided to it. Go ahead and run the unit tests to verify that this project is ready to deploy.
npm run test

Configure Continuous Integration
Authorizing Azure
At the outset of this tutorial, you logged in to Azure with the command az login. This redirected you to a browser and authorized your local command line to access resources on your behalf. Now you will create a Service Principal which will be used to authorize Github to deploy on your behalf. If you followed along on our previous tutorial, you already have an application running in Azure. Replace the tokens {My App Name}, {My Azure Subscription Id}, and {My App Service Plan Id} then execute the following command.
// Your command will look like this:
// az ad sp create-for-rbac --name "covid19tutorial" --role contributor --scopes /subscriptions/7d806f61-8462-123456789-101112-985277452dd7/resourceGroups/appsvc_linux_centralus --sdk-auth
az ad sp create-for-rbac --name "{My App Name}" --role contributor --scopes /subscriptions/{My Azure Subscription Id}/resourceGroups/{My App Service Plan Id} --sdk-auth
The App Service blade in Azure provides all the information you need to configure and run the command above.

When your Service Principal is created, a JSON object is output in the CLI.
- Copy the Service Principal object
- In a Web browser, go to your Github repository
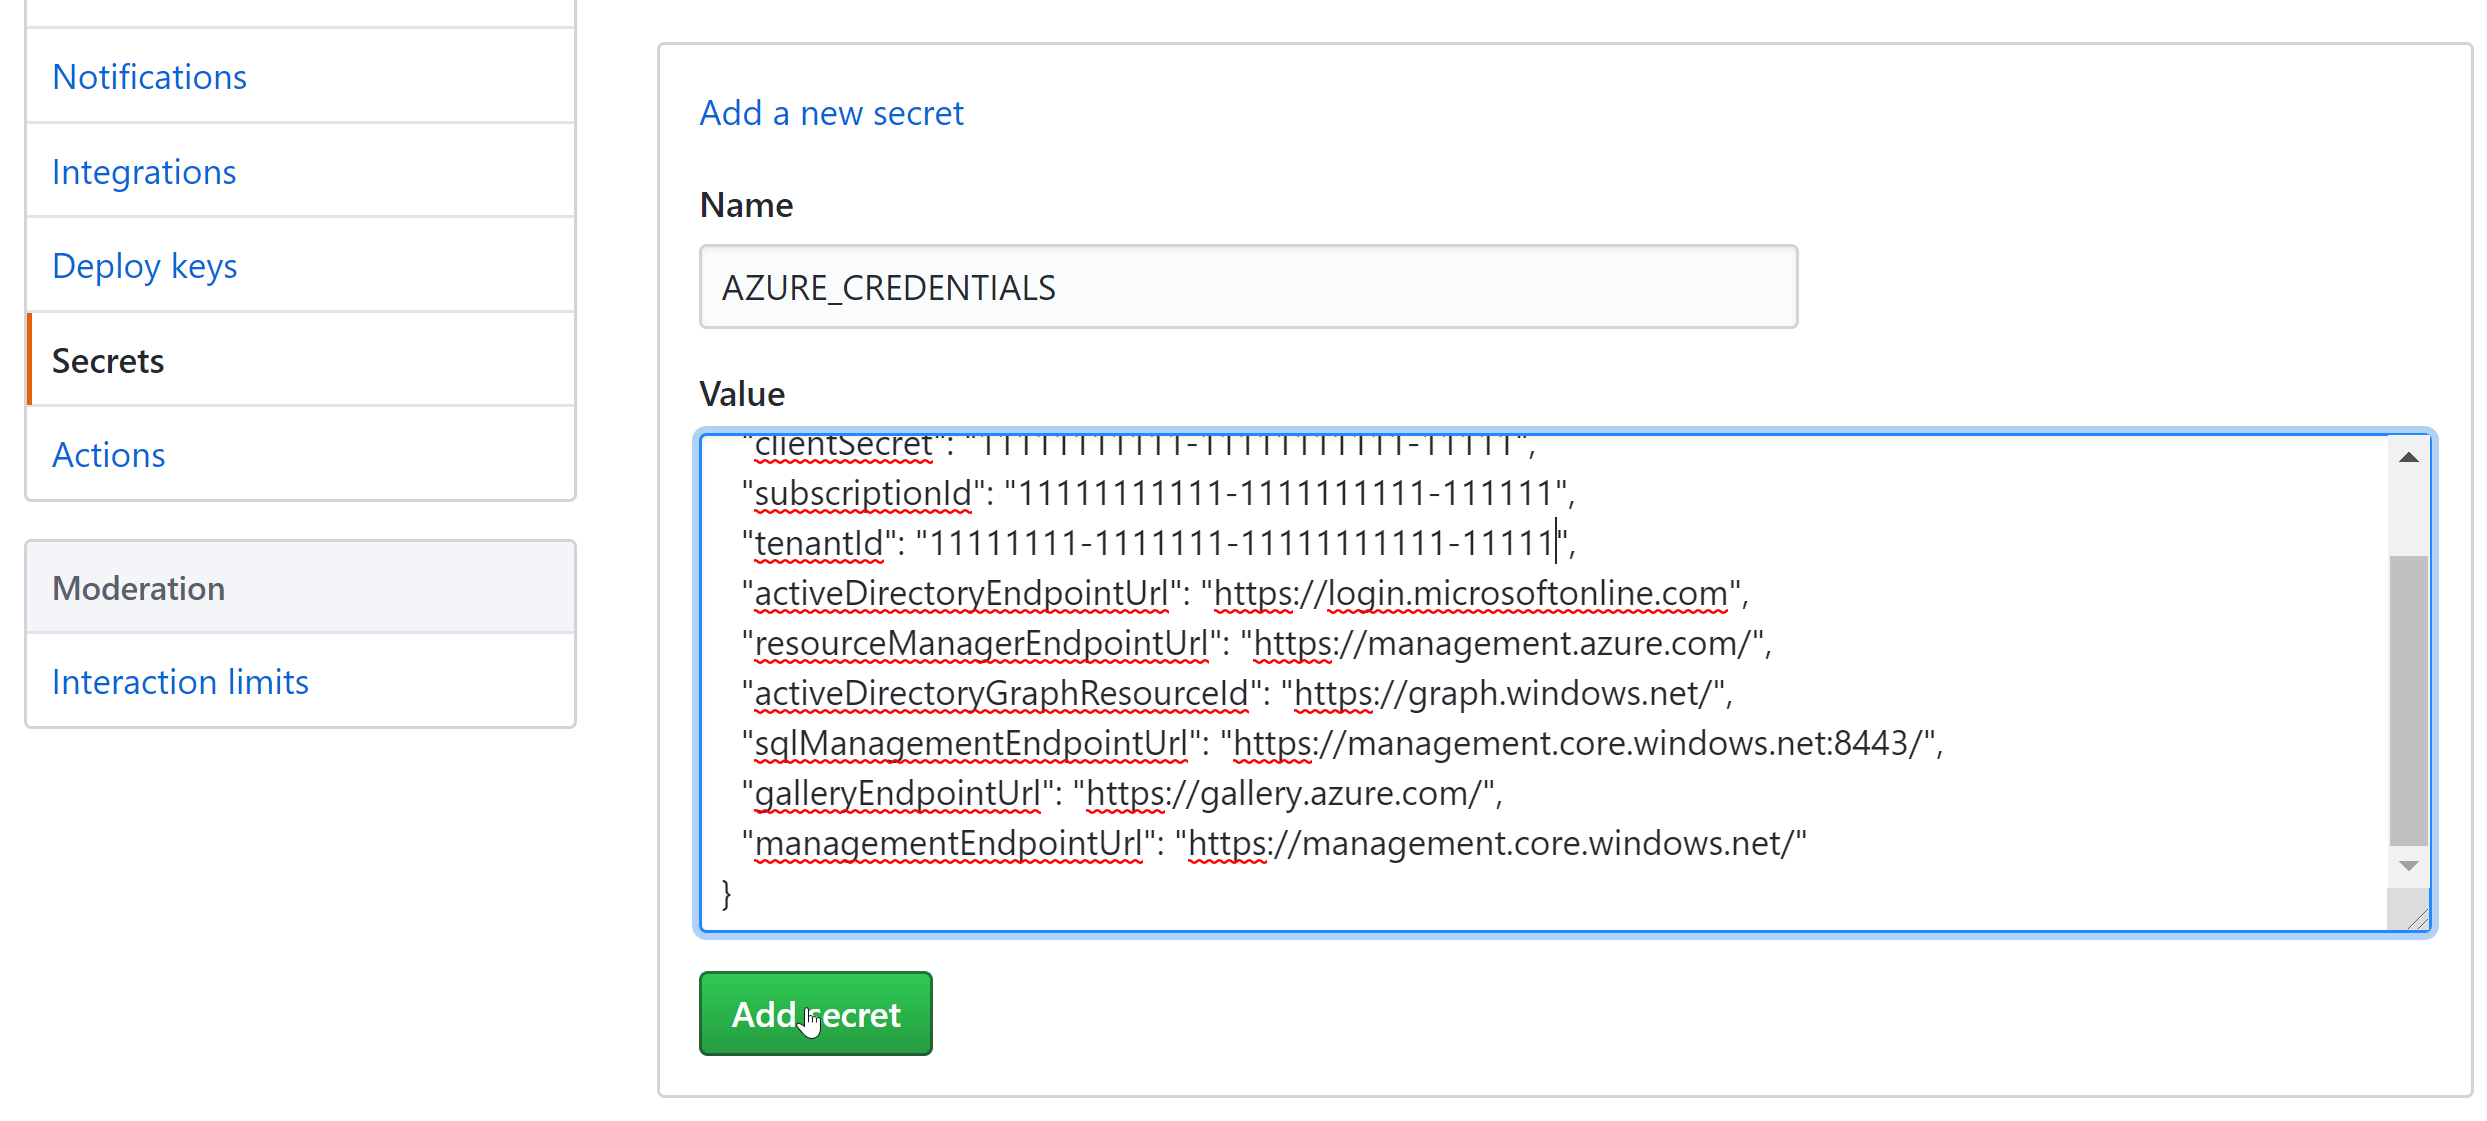
- Navigate to your repository’s Settings page and select Secrets from the menu it provides.
- In the Secrets view, select Add a new secret.
- Name the secrete
AZURE_CREDENTIALSand paste your JSON service principal into the Value field. - Add the secret.

Set Up a Github Workflow
Open the workflow file at .github/worflows/azure.yml and change line 7. It should use the same Application Name you provided when creating the Service Principal.

Deploy with Github Actions
On pushing these code changes to the master branch, our Github workflow will kick off. To make that happen, we will push our code to Github and merge our changes to the master branch. To do that, we’ll be on the command line for a bit. Bear with me.
git add .
git commit -m "Configuration changes for Github workflows."
git push
git checkout master
git pull origin tutorial-3
git push
Navigate to the Actions tab of your Github repository. If all is well, in about 5 minutes, your Web app will deploy to Azure.

Verify Deployment
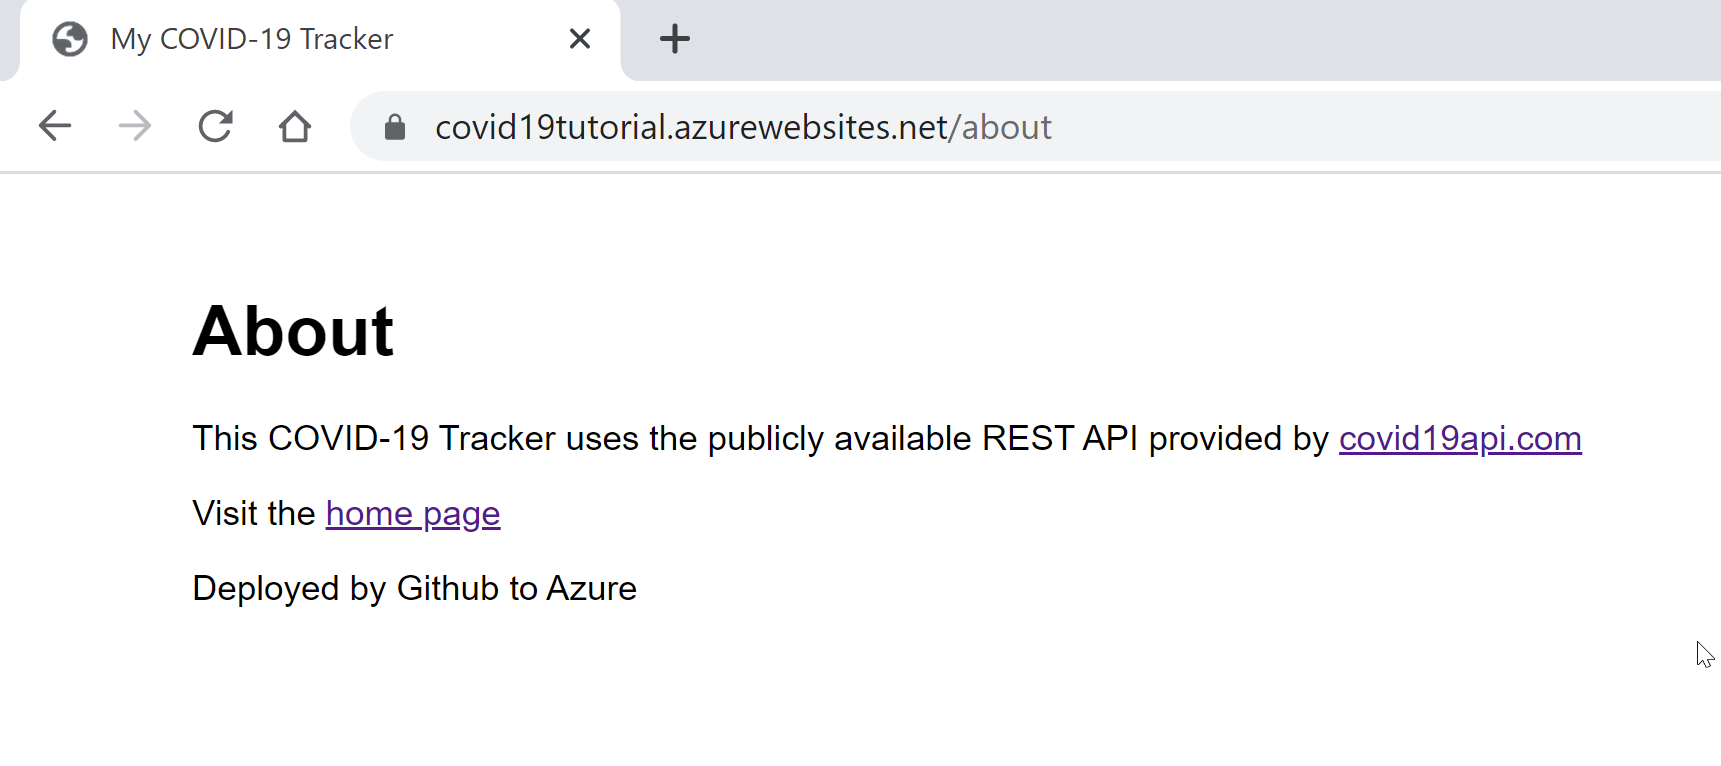
Open the /src/views/about.pug file and add the following line to the end of the file, then save it.
p Deployed by Github to Azure
Next, commit the change and push it up to master.
git add .
git commit -m "Verify Github deployment."
git push
Check out your Actions tab to monitor deployment. On completion, visit your Web app’s About page (for example, *covid19tutorial-myname.azurewebsites.net/about*) to see the paragraph you just deployed.

Conclusion
This tutorial introduced CI/CD concepts and showed an example of Continuous Integration by deploying changes made in a feature branch to Azure. We skipped over some other concepts such as Pull Requests, forking Github repos, and the benefits of breaking large tasks into small chunks. These, you are encouraged to investigate on your own.
Extra Credit
Add an Environment Variable
If you would like to run this project locally, you will need to add an environment variable. On line 6 of the /src/index.js file, you can see why. The process.env property holds all environment variables exposed to this program.
const port = process.env.PORT;
To expose a port to our application, create a .env file in the root of the project. Enter the following line into the file.
PORT=3000
This completes our local configuration. Start the local server.
npm run start
Verify the project is available at http://localhost:3000.
Footnotes
Ferguson, Nicole Phd., Humble, Jez and Gene Kim. Accelerate: Building High Performing Technology Organizations. IT Revolution, 2018, p. 43 ↩︎
Kim, Gene., Jez Humble, Patrick Dubois, and John Willis. The DevOps Handbook: How to Create World-Class Agility, Reliability, and Security in Technology Organizations. IT Revolution, 2016, p. 149 ↩︎

